> ## Documentation Index
> Fetch the complete documentation index at: https://cheetahai.co/docs/llms.txt
> Use this file to discover all available pages before exploring further.
# Quickstart
> Install, set up your wallet, and deploy your first smart contract in 5 minutes
This is a step-by-step walkthrough. Follow along exactly and you'll go from zero to a deployed smart contract on a local blockchain.
## Step 1: Download and Install
Go to [cheetahai.co](https://cheetahai.co) and download the macOS installer.
Open the `.dmg` file. Drag Cheetah AI into your Applications folder.
Open Cheetah AI from Applications.
**macOS will ask for Keychain access** — a system popup appears asking for your Mac login password. This is normal. The app uses the macOS Keychain to securely store your settings and wallet keys (the same vault that holds your Wi-Fi passwords and Safari credentials). Type your Mac password and click **Always Allow** so it doesn't ask again.
Sign in with your Google or GitHub account. This activates your subscription. Your code stays on your machine.
## Step 2: Open a Project
Press `Cmd+O` or go to `File > Open Folder`. Open any project folder — or create a new empty folder for this tutorial.
## Step 3: Open the Chat
Press `Cmd+L`. The AI chat panel opens on the left side. This is where you'll do everything — ask questions, write code, compile, deploy, interact with contracts.
## Step 4: Set Up Your Wallet
Look at the top of the sidebar. You'll see a row of icons — new chat, history, wallet, and settings.
Click the **credit card icon** (💳) in the sidebar header. This opens the wallet panel.
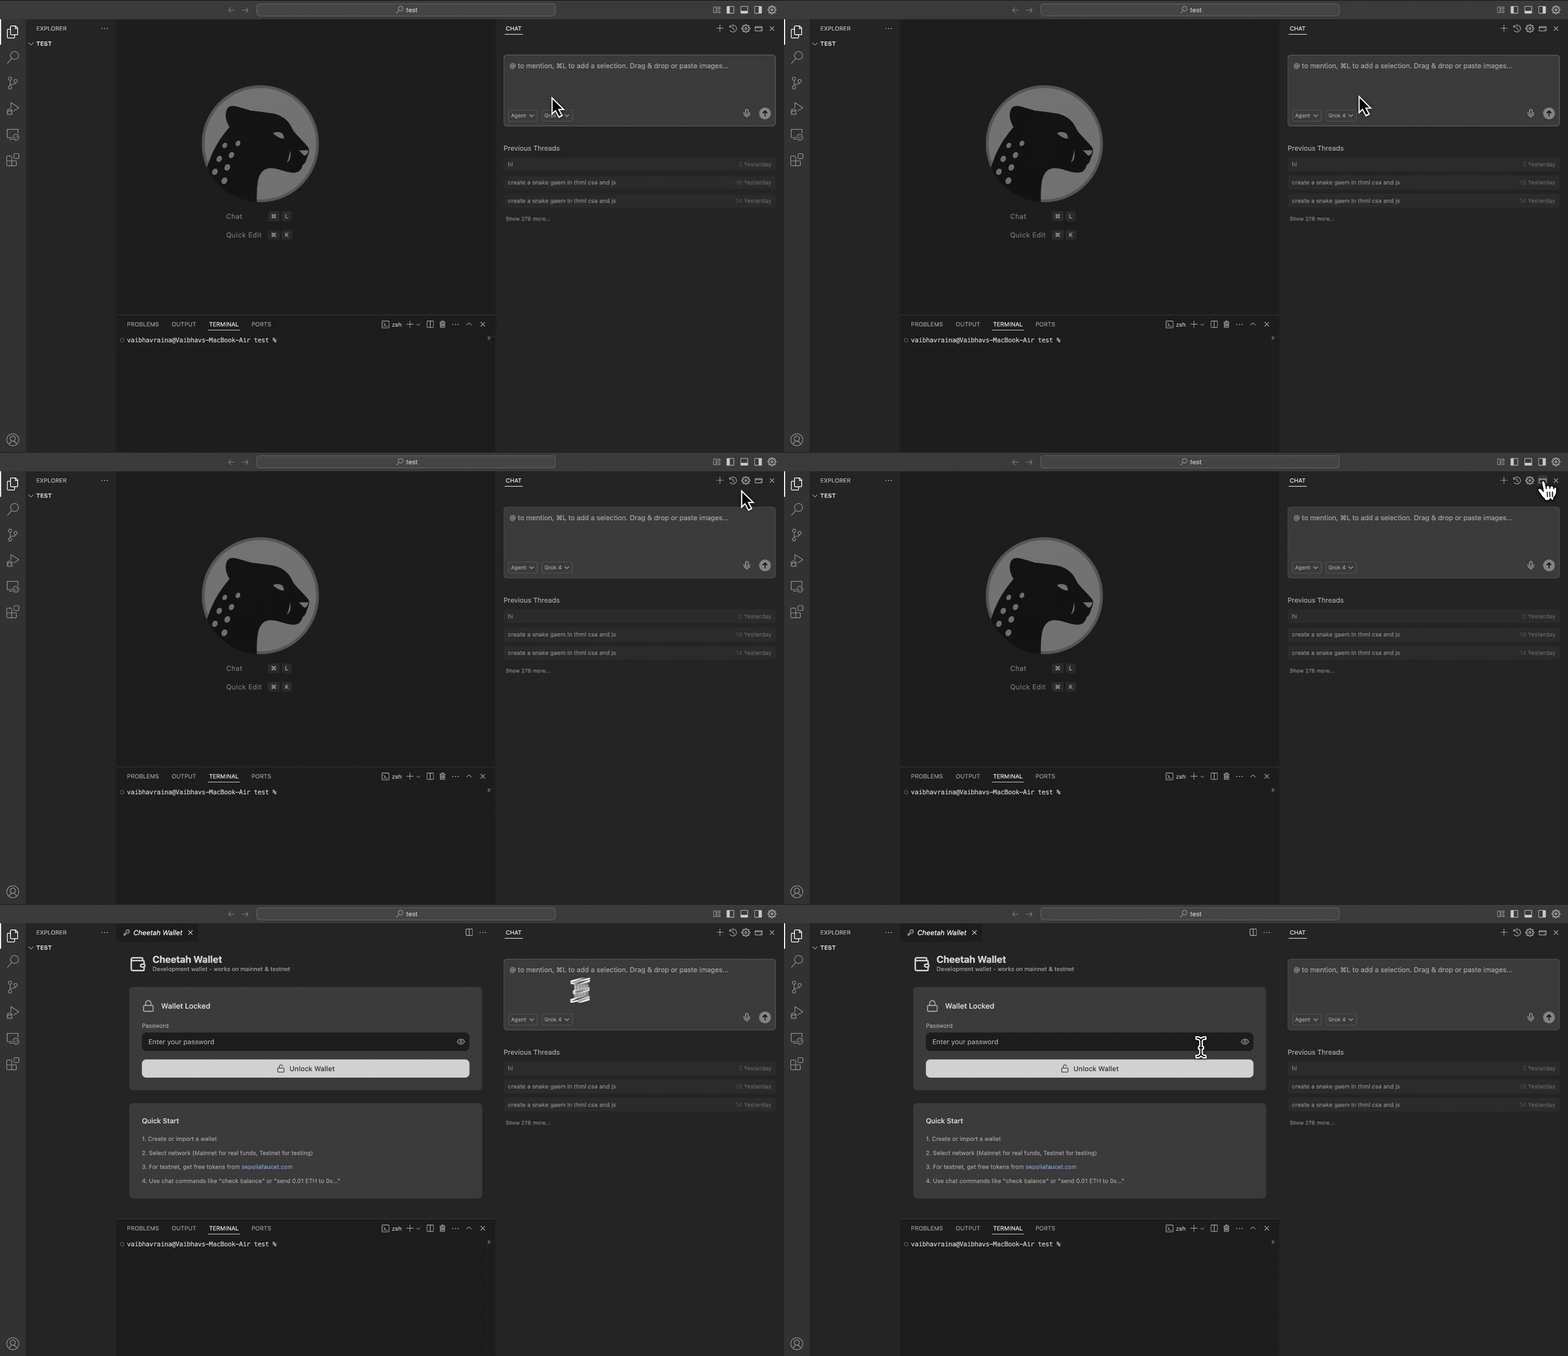 You'll see two options:
* **Create New Wallet** — generates a fresh wallet with both an EVM address (for Ethereum, Polygon, etc.) and a Solana address
* **Import Existing Wallet** — bring in a wallet from MetaMask or Phantom using your private key or seed phrase
### Create a wallet now:
1. Click **Create New Wallet**
2. Enter a password (minimum 8 characters)
3. Confirm the password
4. Click **Create Wallet**
5. **Save your recovery phrase** — write it down somewhere safe, then click "I've saved it, hide this"
Your wallet is now set up. You'll see:
* Your **EVM address** (0x...) — for Ethereum, Polygon, Arbitrum, etc.
* Your **Solana address** (base58) — for Solana networks
* Your **balance** — 0 for now
* A **network dropdown** — this is where you switch chains
## Step 5: Pick a Network
Click the network dropdown in the wallet panel. You'll see three sections:
**Local** — Local EVM and Local Solana. These are blockchains running on your machine. Free, instant, no faucets needed.
**Testnets** — Ethereum Sepolia, Polygon Amoy, Solana Testnet, etc. Real networks with fake money from faucets.
**Mainnets** — Ethereum, Polygon, Solana, etc. Real money. Don't use these until you're ready.
For this tutorial, we'll use **Local EVM**. But don't switch yet — we'll do it through the chat in the next step.
## Step 6: Deploy Your First Smart Contract
Go back to the chat panel (`Cmd+L`). Make sure you're in **Agent** mode (check the mode selector at the bottom of the chat input).
Type this:
```
Create a simple ERC-20 token called MyToken with symbol MTK, compile it, and deploy it to local
```
Hit Enter. Now watch.
The AI will:
1. **Write the contract** — creates a Solidity file with OpenZeppelin imports
2. **Start a local EVM node** — spins up Anvil (a local Ethereum node) at `localhost:8545`
3. **Switch your wallet** to the Local EVM network
4. **Fund your wallet** with test ETH (free, unlimited)
5. **Compile the contract** — runs the Foundry compiler, produces bytecode and ABI
6. **Deploy the contract** — sends the deployment transaction to your local node
7. **Return the contract address** — your contract is now live (locally)
Here's what the compilation looks like:
And the deployment:
The whole thing takes about 30 seconds.
## Step 7: Interact with Your Contract
Your contract is deployed. Now talk to it. Type in the chat:
```
What's the total supply of my token?
```
The AI reads the contract's `totalSupply()` function and returns the result. This is a read operation — free, no gas.
Now try a write operation:
```
Mint 1000 tokens to my address
```
The AI calls the `mint()` function on your deployed contract. Since you're on a local node, gas is free and confirmation is instant.
Check your balance:
```
What's my token balance?
```
You should see 1000 tokens.
## Step 8: Try Solana (Optional)
Want to try Solana too? Type:
```
Create a simple Solana counter program, compile it, and deploy it to local
```
First time using Solana? The AI will need to install the Anchor toolchain (Rust, Solana CLI, Anchor). This takes 5-10 minutes but only happens once.
The AI will:
1. Scaffold an Anchor project
2. Start a local Solana validator at `localhost:8899`
3. Switch your wallet to Local Solana
4. Fund your wallet with test SOL
5. Compile the Rust program
6. Deploy it and return the program ID
## What Just Happened?
You just:
* Set up a crypto wallet inside your IDE
* Wrote, compiled, and deployed a smart contract
* Interacted with it on-chain
* All without touching a terminal, writing a deployment script, or opening a browser extension
Everything happened through the chat. The AI used built-in tools for compilation (Foundry), local blockchain (Anvil), wallet management, and contract interaction.
## What's Next
Now that you've got the basics, here's where to go deeper:
Understand the full development workflow — local, testnet, mainnet. EVM and Solana.
Switch chains, send tokens, manage keys, export to MetaMask/Phantom.
Foundry compilation, testing with forge-std, security auditing, deployment patterns.
Anchor programs, PDAs, SPL tokens, program upgrades.
Normal, Gather, Plan, and Agent — when to use each one.
Cmd+L for chat, Cmd+K for inline edit, and more.
You'll see two options:
* **Create New Wallet** — generates a fresh wallet with both an EVM address (for Ethereum, Polygon, etc.) and a Solana address
* **Import Existing Wallet** — bring in a wallet from MetaMask or Phantom using your private key or seed phrase
### Create a wallet now:
1. Click **Create New Wallet**
2. Enter a password (minimum 8 characters)
3. Confirm the password
4. Click **Create Wallet**
5. **Save your recovery phrase** — write it down somewhere safe, then click "I've saved it, hide this"
Your wallet is now set up. You'll see:
* Your **EVM address** (0x...) — for Ethereum, Polygon, Arbitrum, etc.
* Your **Solana address** (base58) — for Solana networks
* Your **balance** — 0 for now
* A **network dropdown** — this is where you switch chains
## Step 5: Pick a Network
Click the network dropdown in the wallet panel. You'll see three sections:
**Local** — Local EVM and Local Solana. These are blockchains running on your machine. Free, instant, no faucets needed.
**Testnets** — Ethereum Sepolia, Polygon Amoy, Solana Testnet, etc. Real networks with fake money from faucets.
**Mainnets** — Ethereum, Polygon, Solana, etc. Real money. Don't use these until you're ready.
For this tutorial, we'll use **Local EVM**. But don't switch yet — we'll do it through the chat in the next step.
## Step 6: Deploy Your First Smart Contract
Go back to the chat panel (`Cmd+L`). Make sure you're in **Agent** mode (check the mode selector at the bottom of the chat input).
Type this:
```
Create a simple ERC-20 token called MyToken with symbol MTK, compile it, and deploy it to local
```
Hit Enter. Now watch.
The AI will:
1. **Write the contract** — creates a Solidity file with OpenZeppelin imports
2. **Start a local EVM node** — spins up Anvil (a local Ethereum node) at `localhost:8545`
3. **Switch your wallet** to the Local EVM network
4. **Fund your wallet** with test ETH (free, unlimited)
5. **Compile the contract** — runs the Foundry compiler, produces bytecode and ABI
6. **Deploy the contract** — sends the deployment transaction to your local node
7. **Return the contract address** — your contract is now live (locally)
Here's what the compilation looks like:
And the deployment:
The whole thing takes about 30 seconds.
## Step 7: Interact with Your Contract
Your contract is deployed. Now talk to it. Type in the chat:
```
What's the total supply of my token?
```
The AI reads the contract's `totalSupply()` function and returns the result. This is a read operation — free, no gas.
Now try a write operation:
```
Mint 1000 tokens to my address
```
The AI calls the `mint()` function on your deployed contract. Since you're on a local node, gas is free and confirmation is instant.
Check your balance:
```
What's my token balance?
```
You should see 1000 tokens.
## Step 8: Try Solana (Optional)
Want to try Solana too? Type:
```
Create a simple Solana counter program, compile it, and deploy it to local
```
First time using Solana? The AI will need to install the Anchor toolchain (Rust, Solana CLI, Anchor). This takes 5-10 minutes but only happens once.
The AI will:
1. Scaffold an Anchor project
2. Start a local Solana validator at `localhost:8899`
3. Switch your wallet to Local Solana
4. Fund your wallet with test SOL
5. Compile the Rust program
6. Deploy it and return the program ID
## What Just Happened?
You just:
* Set up a crypto wallet inside your IDE
* Wrote, compiled, and deployed a smart contract
* Interacted with it on-chain
* All without touching a terminal, writing a deployment script, or opening a browser extension
Everything happened through the chat. The AI used built-in tools for compilation (Foundry), local blockchain (Anvil), wallet management, and contract interaction.
## What's Next
Now that you've got the basics, here's where to go deeper:
Understand the full development workflow — local, testnet, mainnet. EVM and Solana.
Switch chains, send tokens, manage keys, export to MetaMask/Phantom.
Foundry compilation, testing with forge-std, security auditing, deployment patterns.
Anchor programs, PDAs, SPL tokens, program upgrades.
Normal, Gather, Plan, and Agent — when to use each one.
Cmd+L for chat, Cmd+K for inline edit, and more.